- Brands

- Show all
- Top brands
- Premium brands
- New
- Sale
- 💜 Mother's Day
- Show all
- Gift ideas for Mum
- Classics for Mother’s Day
- Curated beauty highlights
- Fragrances
- Show all
- Women's fragrances
- Show all
- Women's perfumes
- Hair perfume
- Body sprays
- Women's shower gels
- Women's deodorants
- Body care
- Women's soaps
- Women's perfume sets
- Men's fragrances
- Show all
- Men's perfumes
- Aftershave
- Body care
- Men's shower gels
- Men's deodorants
- Men's perfume sets
- Men's soaps
- Perfume scents
- Show all
- Amber perfumes
- Oriental perfumes
- Flowery perfumes
- Fruity perfumes
- Fresh perfumes
- Apple perfumes
- Aromatic perfumes
- Bergamot perfumes
- Chypre perfumes
- Citrus perfumes
- Clean fresh laundry perfumes
- Coconut perfumes
- Jasmine perfumes
- Lily perfumes
- Musk perfume
- Oud perfumes
- Patchouli perfume
- Perfume molecule
- Powdery perfume
- Rose perfumes
- Sandalwood perfumes
- Spicy perfumes
- Vanilla perfumes
- Vetiver perfumes
- Violet perfumes
- Woody perfume
- Perfumes by seasons
- Highlights
- Show all
- Eau de Cologne
- Eau de Parfum
- Eau de Toilette
- Perfume miniatures
- Perfume novelties
- Perfume offers
- Perfume on account
- Popular perfume
- Unisex perfume
- Perfumes by country of origin
- Luxury perfumes
- Niche fragrances
- Home fragrances
- Face
- Show all
- Skin care
- Show all
- Face creams
- Anti-aging creams
- Day creams
- Night creams
- Face oils
- 24-hour facial care
- Anti-pimple care
- BB & CC creams
- Beauty face masks
- Care with Q10
- Face mists
- Facial care without parabens
- Facial sets
- Moisturising creams
- Neck & décolleté
- Tinted moisturiser
- Facial serum
- Show all
- Anti-aging serum
- Collagen serum
- Moisturising serum
- Hyaluronic acid serum
- Vitamin C serum
- Ampoules
- Eye skin care
- Lip care
- Care according to skin needs/skin type
- Show all
- Oily skin care
- Combination skin care
- Sensitive skin care
- Dry skin care
- Acne-prone skin care
- Anti-aging skin care
- Anti-redness skin care
- SPF skin care
- Face masks
- Show all
- Eye & lip masks
- Moisturising masks
- Cleansing masks
- Mud masks
- Cloth masks
- Anti-ageing masks
- Anti-pimple masks
- Blackhead face masks
- Glow masks
- Overnight masks
- Face wash
- Show all
- Face scrub
- Face toners
- Micellar water
- Cleansing gel
- Cleansing oil
- Cleansing cream
- Cleansing foam
- Cleansing milk
- Cleansing powder
- Face cleanser set
- Facial soap
- Make-up remover cloth
- Make-up remover pads
- Makeup remover
- Face care tools & accessories
- Show all
- Facial massage
- Facial cleansing brushes
- Facial cleansing tools
- Gua Sha
- Cosmetic mirror
- Cotton buds
- Eyebrow & eyelash brush
- Eyebrow scissors
- Face mask brush
- Make-up headbands
- Microneedle roller
- Sleep masks
- Tweezers
- Face sun care
- Body
- Show all
- Body care
- Show all
- Body lotions
- Deodorants
- Body butter
- Body oil
- Anti-cellulite creams
- Body foam
- Body spray
- Intimate care
- Massage & essential oils
- Neck & décolleté creams
- Sauna oil & infusion
- Body wash
- Show all
- Shower gels
- Shower oils
- Shower foams
- Body scrubs
- Bath salt & bath bombs
- Bar soaps
- Bath foams
- Bath oils & milks
- Intimate wash
- Liquid soaps
- Shower & bath sets
- Hand skin care
- Foot care
- Nail care
- Show all
- Nail files
- Cuticle remover
- Nail clippers & nippers
- Nail oils
- Nail scissors
- Nail hardener
- Nail Polish
- Skincare sets
- Show all
- Shower & body wash sets
- Pedicure sets
- Gift sets
- Hand & manicure sets
- Body care sets
- Sun cream sets
- Body care accessories
- Show all
- Shower sponges
- Body brushes
- Massage brushes
- Tanning mitt
- Pedicure tools
- Care accessories
- Exfoliating gloves
- Flannel
- Hand bands & anklets
- Manicure tools
- Replacement brushes
- Sun care
- Hair removal
- Bathroom
- Hair
- Show all
- Shampoo
- Show all
- Keratin shampoo
- Pre-shampoo
- Argan oil shampoo
- Smoothing shampoo
- Volumising shampoo
- Men's shampoo
- 2-in-1 shampoo and conditioner
- Clarifying shampoo
- Colour depositing shampoo
- Natural shampoo
- Silicone free shampoo
- Silver shampoo
- Tea tree shampoo
- Dry shampoo
- Anti-dandruff shampoo
- Repair shampoo
- Colour shampoo
- Moisturising shampoo
- Shampoo bars
- Hair soap
- Curl shampoo
- Shampoo sets
- Styling products for hair
- Show all
- Foaming agent
- Heat protection
- Hair wax
- Styling spray
- Root touch-up spray
- Hair gel
- Hair mascara
- Hair powder
- Hair styling sets
- Hairspray
- Sea salt spray
- Styling creams
- Leave-in hair care
- Scalp care
- Care according to hair type
- Show all
- Oily hair
- Fine & straight hair
- Dry hair
- Curly hair
- Coloured hair
- Anti-dandruff
- Anti-frizz
- Hair loss
- Normal hair
- Sensitive scalp
- Conditioner & rinse
- Show all
- Colour conditioner
- Moisturising conditioner
- Anti-dandruff conditioner
- Anti-frizz conditioner
- Build-up & repair rinse
- Conditioner bars
- Conditioners for curly hair
- Volume conditioner
- Hair mask & hair treatment
- Show all
- Hair butters
- Hair treatment for dry hair
- Conditioner for coloured hair
- Moisturising hair treatment
- Keratin hair treatment
- Hair treatment curls
- Hairbrushes & combs
- Show all
- Round brushes
- Detangler brushes
- Flat brushes & paddle brushes
- Wooden hairbrushes
- Hair combs
- Combs for curly hair
- Hair cutting combs
- Head massage brushes
- Skeleton brushes
- Steel combs
- Wild boar hairbrushes
- Hair accessories
- Show all
- Hair ties
- Hair rollers
- Scrunchies
- Hair clips & barrettes
- Hair misters
- Hair accessories
- Hair curlers
- Hairpins
- Hair styling tools
- Makeup
- Show all
- Face makeup
- Show all
- Foundation
- Concealer
- Face powder
- Blusher
- Highlighter
- BB- & CC-Cream
- Camouflage Make-up
- Colour corrector
- Contouring
- Contouring palettes
- Face primer
- Make-up remover
- Mineral powder
- Setting spray & setting powder
- Concealer products
- Accessoires
- Anti-ageing make-up
- Bronzer
- Compact foundation
- Cream foundation
- Effect products
- Liquid foundation
- Compact powder
- Loose powder
- Makeup sets
- Adhesive tattoos
- Eyes
- Show all
- Eyeshadow
- Mascara
- Eyeliner
- Cream eyeshadow
- Eyeshadow primer
- Artificial eyelashes
- Eye makeup remover
- Eye shadow palettes
- Eyelash brushes
- Eyelash curlers
- Eyelash glue
- Eyelash primer
- Glitter eyeshadow
- Eyebrow colour
- Kajal
- Sets
- Eyebrows
- Show all
- Eyebrow tint
- Eyebrow gel & mascara
- Eyebrow pomade
- Eyebrow powder
- Eyebrow pencils
- Eyebrow scissors
- Tweezers
- Lips
- Show all
- Lipstick
- Lip gloss
- Lip liner
- Lip plumper
- Liquid Lipstick
- Lip accessories
- Lip balm
- Lip primer
- Matte lipstick
- Lipstick sets
- Nails
- Show all
- Nail varnish
- Base Coat
- Top Coat
- Nail hardener
- Nail files
- Cuticle remover
- False nails & nail design
- Gel nail polish
- Nail clippers
- Nail polish remover
- Nail scissors
- UV lamps
- Nail care
- Nail sets
- Makeup brushes
- Show all
- Foundation brushes
- Eyeshadow brushes
- Lip brush
- Brush cleaner
- Blusher brushes
- Applicators
- Brush bags
- Brush sets
- Concealer brushes
- Eyebrow brush
- Eyeliner brush
- Face pack applicators
- Highlighter brush
- Powder brush
- Powder puffs
- Makeup accessories
- Show all
- Pencil sharpeners
- Makeup mirrors
- Makeup bags
- Empty makeup palettes
- Makeup sponges
- Blotting Paper
- Konjac sponges
- Nails
- Complexion
- Eyes
- Lips
- Sets
- Waterproof make-up
- Show all
- Waterproof eyeliner
- Waterproof foundation
- Waterproof mascara
- Waterproof concealer
- Waterproof eye shadow
- Waterproof eyebrow pencils
- Highlights
- Travel Size
- Men's grooming
- Show all
- Skincare
- Shaving
- Show all
- Shaving cream
- Wet shavers
- After shave balms & lotions
- Electric shavers and trimmers
- Safety razors & shaving accessories
- Men's shaver
- Nose hair removal
- Pre-Shave
- Razor
- Shaving bowl
- Shaving brush
- Shaving foam
- Shaving gel
- Shaving sets men
- Shaving soaps
- Shaving stand
- Beard Care
- Show all
- Beard balms
- Beard combs & beard brushes
- Beard oils
- Beard clippers & beard trimmers
- Beard soaps & beard shampoos
- Beard grooming sets
- Beard Scissors
- Hair products
- Show all
- Shampoos
- Pomades
- Hairstyling
- Hair colour
- Hair loss & hair regrowth
- Hair brushes and combs
- Hair clippers
- Hair creams
- Hair gel
- Hair pastes
- Haircare
- Bodycare
- Toiletries
- Show all
- Facial care
- Hair
- Body care
- Make-up
- Perfume
- Accessories
- Natural Cosmetics
- Show all
- Face
- Perfume
- Make-up
- Body
- Hair
- Certified Natural Cosmetics
- Health
- Show all
- Vitamins & minerals
- Show all
- Vitamin A
- Vitamin B
- Vitamin C
- Vitamin D
- Iron
- Vitamin E
- Vitamins
- Multivitamins
- Calcium
- Folic acid
- Magnesium
- Zinc
- Other minerals
- Bandages & wound care
- Sex toys
- Aromatherapy
- Cold
- Nutrition
- Disinfection
- Well-being & immunity
- Show all
- Cholesterol
- Eyes
- Liver & gallbladder
- Memory & concentration
- Nerves & calming
- Prostate & Bladder
- Veins
- Heart & circulation
- Immune system
- Stomach & Digestion
- Muscles & joints
- Feminine hygiene
- Beauty comes from within
- Free of charge
- Gift sets
- Blog
Base Coat by NEONAIL
(9 Item)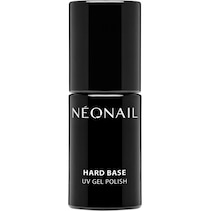
NEONAIL
Base Coat
Nails
Hard Base
13.99 € 12.59 € 12.59 €
10.49 €
9.44 €
13.99 €
12.59 €
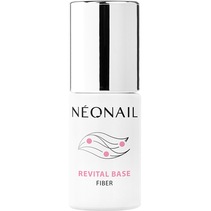
NEONAIL
Base Coat
Nails
Revital Base Fibre
13.99 € 12.59 € 12.59 €
10.49 €
9.44 €
13.99 €
12.59 €
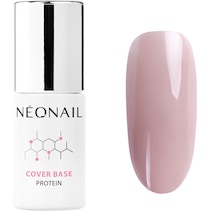
NEONAIL
Base Coat
Nails
Cover Base Protein
13.99 € 12.59 € 12.59 €
10.49 €
9.44 €
13.99 €
12.59 €
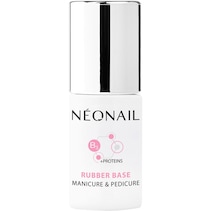
NEONAIL
Base Coat
Nails
Rubber Base Manicure & Pedicure
13.99 € 12.59 € 12.59 €
10.49 €
9.44 €
13.99 €
12.59 €
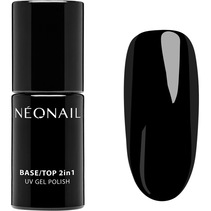
NEONAIL
Base Coat
Nails
Base/top 2in1
12.99 € 11.69 € 11.69 €
9.74 €
8.77 €
12.99 €
11.69 €
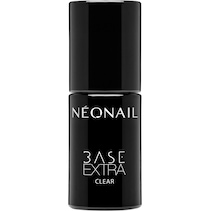
NEONAIL
Base Coat
Nails
Base Extra Clear
16.99 € 15.29 € 15.29 €
12.74 €
11.47 €
16.99 €
15.29 €
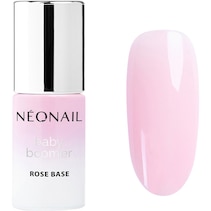
NEONAIL
Base Coat
Nails
Baby Boomer
13.99 € 12.59 € 12.59 €
10.49 €
9.44 €
13.99 €
12.59 €

NEONAIL
Baby Boomer
Collections
Baby Boomer Set - Rose
29.99 € 26.99 € 26.99 €
€22.49 / 1 pcs.
€20.24 / 1 pcs.
22.49 €
20.24 €
29.99 €
26.99 €
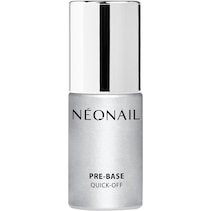
NEONAIL
Base Coat
Nails
Pre-Base Quick Off
11.99 € 10.79 € 10.79 €
8.99 €
8.09 €
11.99 €
10.79 €